Difference between revisions of "New Player Guide: Basics"
m |
m (added yellow arrow icons) |
||
| (4 intermediate revisions by the same user not shown) | |||
| Line 1: | Line 1: | ||
| − | [[Image:Play guide banner.jpg|center]] | + | [[Image:Play guide banner.jpg|center|alt=New Player Guide - UOGuide|link=]] |
{{tocright|2}} | {{tocright|2}} | ||
| Line 51: | Line 51: | ||
| colspan="2" | | | colspan="2" | | ||
<gallery widths="300px" heights="200px" perrow=2> | <gallery widths="300px" heights="200px" perrow=2> | ||
| − | File:Guide CC skills menu.jpg|[[Classic Client]] - Clicking on the skills icon [[File:Guide CC skills icon.jpg]] from the [[New Player Guide: Introduction to the Interface#Paperdoll|Paperdoll]] will open a window where you can see the current level of each skill. On this menu, there are small yellow arrows, or locks, located next to each skill. These indicate whether a skill will increase, decrease or not change at all. To gain in a specific skill, make sure the arrow is pointing up. By default, all skills are set to increase as displayed by the upward arrow next to them. | + | File:Guide CC skills menu.jpg|[[Classic Client]] - Clicking on the skills icon [[File:Guide CC skills icon.jpg]] from the [[New Player Guide: Introduction to the Interface#Paperdoll|Paperdoll]] will open a window where you can see the current level of each skill. On this menu, there are small yellow arrows (<span style="color:#B8860B">▲ ▼</span>), or locks, located next to each skill. These indicate whether a skill will increase, decrease or not change at all. To gain in a specific skill, make sure the arrow is pointing up (<span style="color:#B8860B">▲</span>). By default, all skills are set to increase as displayed by the upward arrow next to them. |
| − | File:Guide EC skills menu.jpg|[[Enhanced Client]] - Clicking on the skills icon [[File:Guide EC skills icon.jpg|25px]] from the [[New Player Guide: Introduction to the Interface#Player Quick Menu|Player Quick Menu]] will open a window where you can see the current level of each skill. On this menu, there are small yellow arrows, or locks, located next to each skill. These indicate whether a skill will increase, decrease or not change at all. To gain in a specific skill, make sure the arrow is pointing up. By default, all skills are set to increase as displayed by the upward arrow next to them. | + | File:Guide EC skills menu.jpg|[[Enhanced Client]] - Clicking on the skills icon [[File:Guide EC skills icon.jpg|25px]] from the [[New Player Guide: Introduction to the Interface#Player Quick Menu|Player Quick Menu]] will open a window where you can see the current level of each skill. On this menu, there are small yellow arrows (<span style="color:#B8860B">▲ ▼</span>), or locks, located next to each skill. These indicate whether a skill will increase, decrease or not change at all. To gain in a specific skill, make sure the arrow is pointing up (<span style="color:#B8860B">▲</span>). By default, all skills are set to increase as displayed by the upward arrow next to them. |
</gallery> | </gallery> | ||
|} | |} | ||
| Line 71: | Line 71: | ||
| colspan="2" | | | colspan="2" | | ||
<gallery widths="300px" heights="200px" perrow=2> | <gallery widths="300px" heights="200px" perrow=2> | ||
| − | File:Guide CC character status.jpg|[[Classic Client]] - Clicking on the status icon [[File:Guide CC status icon.jpg]] from the [[New Player Guide: Introduction to the Interface#Paperdoll|Paperdoll]] will open the Character Status Menu where you can see your current statistics. On this menu, there are small yellow arrows, or locks, located next to each stat. These indicate whether a stat will increase, decrease or not change at all. To gain in a specific stat, make sure the arrow is pointing up. By default, all stats are set to increase as displayed by the upward arrow next to them. {{Line Break}} You can minimize the Character Status Window into a bar by clicking on the crossing squares on the right bottom of the menu: {{Line Break}} [[File:Guide CC status bar.jpg|center]] The bar displays (from top to bottom) your '''Hit Points''' (H), '''Mana''' (M) and '''Stamina''' (S). | + | File:Guide CC character status.jpg|[[Classic Client]] - Clicking on the status icon [[File:Guide CC status icon.jpg]] from the [[New Player Guide: Introduction to the Interface#Paperdoll|Paperdoll]] will open the Character Status Menu where you can see your current statistics. On this menu, there are small yellow arrows (<span style="color:#B8860B">▲ ▼</span>), or locks, located next to each stat. These indicate whether a stat will increase, decrease or not change at all. To gain in a specific stat, make sure the arrow is pointing up (<span style="color:#B8860B">▲</span>). By default, all stats are set to increase as displayed by the upward arrow next to them. {{Line Break}} You can minimize the Character Status Window into a bar by clicking on the crossing squares on the right bottom of the menu: {{Line Break}} [[File:Guide CC status bar.jpg|center]] The bar displays (from top to bottom) your '''Hit Points''' (H), '''Mana''' (M) and '''Stamina''' (S). |
| − | File:Guide EC character sheet.jpg|[[Enhanced Client]] - Clicking on the character sheet icon {{Line Break}} [[File:Guide EC character sheet icon.jpg|center]] from the [[New Player Guide: Introduction to the Interface#Paperdoll|Paperdoll]] will open the Character Sheet where you can see your current statistics. On this sheet, there are small yellow arrows, or locks, located next to each stat. These indicate whether a stat will increase, decrease or not change at all. To gain in a specific stat, make sure the arrow is pointing up. By default, all stats are set to increase as displayed by the upward arrow next to them. {{Line Break}} Note that your <span style="color:FireBrick">'''Hit Points'''</span>, <span style="color:MidnightBlue">'''Mana'''</span> and <span style="color:Gold">'''Stamina'''</span> are also displayed on the status bar: [[File:Guide EC status bar.jpg]] | + | File:Guide EC character sheet.jpg|[[Enhanced Client]] - Clicking on the character sheet icon {{Line Break}} [[File:Guide EC character sheet icon.jpg|center]] from the [[New Player Guide: Introduction to the Interface#Paperdoll|Paperdoll]] will open the Character Sheet where you can see your current statistics. On this sheet, there are small yellow arrows (<span style="color:#B8860B">▲ ▼</span>), or locks, located next to each stat. These indicate whether a stat will increase, decrease or not change at all. To gain in a specific stat, make sure the arrow is pointing up (<span style="color:#B8860B">▲</span>). By default, all stats are set to increase as displayed by the upward arrow next to them. {{Line Break}} Note that your <span style="color:FireBrick">'''Hit Points'''</span>, <span style="color:MidnightBlue">'''Mana'''</span> and <span style="color:Gold">'''Stamina'''</span> are also displayed on the status bar: [[File:Guide EC status bar.jpg]] |
</gallery> | </gallery> | ||
|} | |} | ||
| Line 90: | Line 90: | ||
You can initiate the combat by: | You can initiate the combat by: | ||
*double clicking on a target while in War mode. You can toggle between War and Peace modes by pressing the Tab key. | *double clicking on a target while in War mode. You can toggle between War and Peace modes by pressing the Tab key. | ||
| − | + | ||
| − | + | ||
{| cellpadding="10" align="center" style="border: 1px solid darkgray;" | {| cellpadding="10" align="center" style="border: 1px solid darkgray;" | ||
| | | | ||
| Line 100: | Line 99: | ||
| | | | ||
{| cellpadding="10" align="center" style="border: 1px solid darkgray;" | {| cellpadding="10" align="center" style="border: 1px solid darkgray;" | ||
| − | |[[Enhanced Client]] - You can set your Peace/War toggle to War by clicking on the Peace button [[File:Guide EC peace button.jpg]] from the [[New Player Guide: Introduction to the Interface#Player Quick Menu|Player Quick Menu]]. The same way, you can return to Peace mode by clicking on the War button [[File:Guide EC war button.jpg]] | + | |[[Enhanced Client]] - You can set your Peace/War toggle to War by clicking on the Peace button [[File:Guide EC peace button.jpg]] from the [[New Player Guide: Introduction to the Interface#Player Quick Menu|Player Quick Menu]]. The same way, you can return to Peace mode by clicking on the War button [[File:Guide EC war button.jpg]] |
|} | |} | ||
|} | |} | ||
| − | + | ||
| − | + | ||
| − | + | ||
*or by casting a [[#Spells|Spell]] and single clicking on a target. | *or by casting a [[#Spells|Spell]] and single clicking on a target. | ||
| Line 168: | Line 165: | ||
Every weapon have at least eight item properties that can be seen by placing the mouse over the item: | Every weapon have at least eight item properties that can be seen by placing the mouse over the item: | ||
*Weight: The weights of items in Ultima Online are measured in stones. The total weight you can carry is determined by your strength. | *Weight: The weights of items in Ultima Online are measured in stones. The total weight you can carry is determined by your strength. | ||
| − | *Damage Type: Damage Types is a collective, generic term for the areas in which damage is meted out and armor is designed to resist. | + | *Damage Type: Damage Types is a collective, generic term for the areas in which damage is meted out and [[#Armor & Resistances|armor]] is designed to resist. |
| − | *Weapon Damage: This is the base damage a weapon can inflict without taking into consideration the armor of the target or the level of the character's [[#skills|skills]] and [[#stats|stats]]. | + | *Weapon Damage: This is the base damage a weapon can inflict without taking into consideration the [[#Armor & Resistances|armor]] of the target or the level of the character's [[#skills|skills]] and [[#stats|stats]]. |
*Weapon Speed: It specifies the delay between two swings of the weapon in seconds without the Swing Speed Increase or the Stamina bonus. | *Weapon Speed: It specifies the delay between two swings of the weapon in seconds without the Swing Speed Increase or the Stamina bonus. | ||
*Strength Requirement: It denotes the minimum amount of the strength stat required to equip the item. | *Strength Requirement: It denotes the minimum amount of the strength stat required to equip the item. | ||
| Line 186: | Line 183: | ||
| onehandedweapon=yes | | onehandedweapon=yes | ||
| skillrequired=Swordsmanship | | skillrequired=Swordsmanship | ||
| − | | | + | | durability=36 |
}} | }} | ||
|} | |} | ||
| Line 199: | Line 196: | ||
| − | <!-- Armor --> | + | <!-- Armor & Resistances --> |
{| cellpadding="10" style="border: 1px solid darkgray;" | {| cellpadding="10" style="border: 1px solid darkgray;" | ||
| width="120px" valign="top" | | | width="120px" valign="top" | | ||
| Line 241: | Line 238: | ||
| energyresist=3 | | energyresist=3 | ||
| strengthrequirement=25 | | strengthrequirement=25 | ||
| − | | durability= | + | | durability=48 |
}} | }} | ||
|} | |} | ||
| Line 247: | Line 244: | ||
| colspan="2" | | | colspan="2" | | ||
<gallery widths="300px" heights="200px" perrow=2> | <gallery widths="300px" heights="200px" perrow=2> | ||
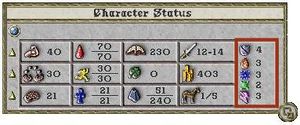
| − | File:Guide CC character status resistances.jpg|[[Classic Client]] - You can see your current total resistances by clicking on the status icon [[File:Guide CC status icon.jpg]] from the [[New Player Guide: Introduction to the Interface#Paperdoll|Paperdoll]] which will open the Character Status Window. The symbols represent (from top to bottom) the total physical, fire, cold, poison and energy resistance. {{Line Break}}You can equip a piece of armor the same way you equip a weapon: by dragging and dropping the it from your [[New Player Guide: Introduction to the Interface#Backpack|Backpack]] to your [[New Player Guide: Introduction to the Interface#Paperdoll|Paperdoll]]. | + | File:Guide CC character status resistances.jpg|[[Classic Client]] - You can see your current total resistances by clicking on the status icon [[File:Guide CC status icon.jpg]] from the [[New Player Guide: Introduction to the Interface#Paperdoll|Paperdoll]] which will open the Character Status Window. The symbols represent (from top to bottom) the total physical, <span style="color:OrangeRed">fire</span>, <span style="color:SteelBlue">cold</span>, <span style="color:ForestGreen">poison</span> and <span style="color:MediumVioletRed">energy</span> resistance. {{Line Break}}You can equip a piece of armor the same way you equip a weapon: by dragging and dropping the it from your [[New Player Guide: Introduction to the Interface#Backpack|Backpack]] to your [[New Player Guide: Introduction to the Interface#Paperdoll|Paperdoll]]. |
File:Guide EC character sheet resistances.jpg|[[Enhanced Client]] - You can see your current total resistances by clicking on the character sheet icon {{Line Break}} [[File:Guide EC character sheet icon.jpg|center]] from the [[New Player Guide: Introduction to the Interface#Paperdoll|Paperdoll]] which will open the Character Sheet. {{Line Break}}You can equip a piece of armor the same way you equip a weapon: by dragging and dropping the it from your [[New Player Guide: Introduction to the Interface#Backpack|Backpack]] to your [[New Player Guide: Introduction to the Interface#Paperdoll|Paperdoll]]. | File:Guide EC character sheet resistances.jpg|[[Enhanced Client]] - You can see your current total resistances by clicking on the character sheet icon {{Line Break}} [[File:Guide EC character sheet icon.jpg|center]] from the [[New Player Guide: Introduction to the Interface#Paperdoll|Paperdoll]] which will open the Character Sheet. {{Line Break}}You can equip a piece of armor the same way you equip a weapon: by dragging and dropping the it from your [[New Player Guide: Introduction to the Interface#Backpack|Backpack]] to your [[New Player Guide: Introduction to the Interface#Paperdoll|Paperdoll]]. | ||
</gallery> | </gallery> | ||
|} | |} | ||
| + | |||
| + | <!-- Runes & Facets & Moongates --> | ||
| + | {| cellpadding="10" style="border: 1px solid darkgray;" | ||
| + | | width="120px" valign="top" | | ||
| + | ===Rune Stones, Facets & Moongates=== | ||
| + | [[File:Sign post.png|center]] | ||
| + | | | ||
| + | {| cellpadding="10" style="border: 1px solid darkgray;" | ||
| + | | valign="top" | | ||
| + | [[File:Moongate blue transparent.png]] | ||
| + | | valign="top" | | ||
| + | Moongates are magical warp portals connecting two or more places together. The most common Moongates are the constant Moongates next to or in every major town, all of which connect to each other. | ||
| + | |||
| + | A character who steps into a non-player-created moongate is presented with a menu of destinations - all of the static moongates on the server. Players with sufficient Magery may also temporarily create Moongates linking only two areas together utilizing a Rune Stone. | ||
| + | |} | ||
| + | |||
| + | |||
| + | {| cellpadding="10" style="border: 1px solid darkgray;" | ||
| + | | valign="top" | | ||
| + | [[File:Rune Stone.png]] Rune Stones are one of Ultima Online's most useful items: When used as the target of the Magery spell Mark, the caster's current location is stored within. Anyone with access to the rune may then travel there instantly using the Magery spells Recall and Gate Travel, or Chivalry spell Sacred Journey. They may be purchased from NPC Mage Vendors. | ||
| + | |||
| + | Runes weigh one stone each and cannot be stacked. However, once marked they may be placed within a Runebook. The books also weigh a single stone but do not gain weight no matter how many runes are placed within, and can furthermore be used to store Recall scrolls for those characters without magical capabilities of their own. | ||
| + | |||
| + | Once marked, a rune will change color according to the Facet it now leads to. In addition, it will be named according to the area within that facet. You may rename runes by double clicking on them. | ||
| + | |} | ||
| + | |||
| + | |||
| + | {| cellpadding="10" style="border: 1px solid darkgray;" | ||
| + | | valign="top" | | ||
| + | The world is split up into 6 facets: | ||
| + | |||
| + | *[[File:Rune Felucca.png]] The facet before there were others, [[Felucca]] is the original. This facet allows non-consentual [[PvP]] and the [[stealing]] from other players. Player housing is allowed in Felucca. Resources are double here, and it is the only facet in which a [[power scroll]] can be obtained at a [[Champion Spawn]]. | ||
| + | |||
| + | *[[File:Rune Trammel.png]] [[Trammel]] was introduced with the [[Ultima Online: Renaissance|Rennisance]] expansion. Non-consensual [[PvP]] is not allowed, nor are players stealing from players. Player housing is allowed in Trammel. Every facet except [[Felucca]] uses the basic Trammel rules set, with modifications. | ||
| + | |||
| + | * Ilshenar was introduced with the [[Ultima Online: Third Dawn|Third Dawn]] expansion. Player housing is not allowed here. There are several dungeons (though some players refer to the entire map as "one big dungeon"). [[Paragon]] monsters and certain [[artifacts]] spawn here. One cannot use the transportation spells [[Recall]], [[Gate Travel]], or [[Sacred Journey]] to get into Ilshenar. Entrance to Ilshenar is exclusively through [[moongate]]s. Ilshenar's gates are located at the [[Shrines]] of [[Virtue]] and the [[Shrine]] of [[Chaos]]. One can, however, leave Ilshenar using [[Recall]] or [[Sacred Journey]] (but not [[Gate Travel]]). | ||
| + | |||
| + | *[[File:Rune Malas.png]] [[Malas]] was introduced with the [[Age of Shadows]] expansion. Its primary features are the cities of [[Luna]] and [[Umbra]], lots and lots of player housing, and the Dungeon [[Doom]]. There are several unique locations as well, such as [[Grimswind Ruins]]. | ||
| + | |||
| + | *[[File:Rune Tokuno Islands.png]] The [[Tokuno Islands]] are 3 islands introduced with the [[Samurai Empire]] expansion. The islands are Asian themed. Player housing is allowed, but only to a limited extent, thus making real estate there very expensive. There is one city, [[Zento]]. It has several [[dungeons]]. Use of the transportation spells [[Sacred Journey]], [[Recall]], and [[Gate Travel]] is unrestricted in Tokuno except in the dungeons. | ||
| + | |||
| + | *[[File:Rune Ter Mur.png]] [[Ter Mur]] was introduced with the [[Stygian Abyss]] expansion. It is primarily a dormant volcanic environ interspersed with lush vegetation and rivers. Inhabited natively by [[Gargoyles]], their ruler is [[Zhah|Queen Zhah]] who holds court within the walled [[Royal City]]. Other than a [[moongate]], Ter Mur can be reached by traversing the [[Stygian Abyss Dungeon]] from Britannia. | ||
| + | |} | ||
| + | |} | ||
Latest revision as of 18:01, 10 August 2012

Basics
Now that you are more familiar with the interface, it is time to take a walk and get to know the town around you. Depending on your starting location, you are now inside the local Inn or the city Bank .
Inns & Banks |
Inns act as lodging places for travelers who seek shelter to rest safely. They are safe places where you can log out instantaneously. Banks provide a place of storage, also known as the |
Context Menu & NPCs |
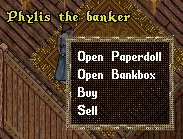
The term Context Menu refers to a menu accessed by single clicking on something (or holding down shift, then single clicking on something, if one has selected the option to handle it that way). Several game mechanics can be accessed this way. A Non-Player Character (NPC) is any character that is not controlled by a player. The term's polar opposite is Player Character. Although not controlled by players, monsters and animals are not generally considered NPCs. Hostile NPCs are sometimes categorized with other creatures or monsters. Typical examples of NPCs include: Bankers, Minters, Healers, Vendors and Guards. You can also pay NPCs for training your Skills up to a certain level. |
|
| |
Skills |
Ultima Online has 58 different skills currently in game which determine the capabilities of your Character. As a new player, you can expend up to 700 points between these however you desire. In order to improve in a skill you simply carry out the associated actions. For example, if you wish to train as a Swordsman, simply fight Monsters with a sword equipped. Likewise, casting a Fishing Pole out into the water is all it takes to become a better Fisherman. Each skill is associated with certain Statistics, which are trained in the same manner. You can usually pay NPCs for training up to a certain level. For example, visit your local blacksmith's shop and you should be able to learn some of their trade via their Context Menus. You will be expected to pay for these services, of course, though the Gold requested is a pittance. The gold amount is 1 GP per 1/10 of skill with the highest amount of skill costing 400 gold for 40 skill points. |
| |
Statistics |
Stats, an abbreviation of statistics, refers to the three statistics all characters have in varying amounts, as follows:
|
| |
Combat |
There are two kinds of combat:
You can initiate the combat by:
Note that if you are attacked, you will counter attack automatically, whether or not you're in War mode. |
Spells |
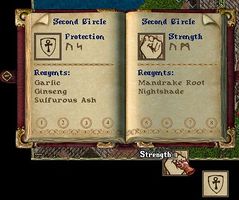
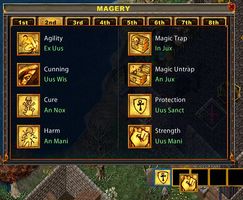
Skilled spell casters are able to attack enemies, aid themselves and allies, move objects and themselves, create things out of nothing, summon creatures and a whole host of other actions that most people imagine when they think of magic. While some spells require the use of components, or reagents, in order to cast them, others do not. Spells are added to spellbooks by dropping an appropriate scroll onto the spellbook in question. Low level spell scrolls can be purchased from NPCs that are located in town magic shops, while high level scrolls can be found as loot on certain monsters. There are eight different spellbooks:
| ||
| |||
Weapons |
Weapons are any items that can be equipped in a character's hands and then used to do either melee or ranged damage to another target. They are wielded using either one or two hands. Weapons can possess a wide range of item properties, including damage increases, swing speed increases, abilities for leeching hit points or mana, casting various spells automatically upon a successful hit, and many more. Weapons are usually categorized by what skill is required to wield them effectively:
| ||||||||||||
| |||||||||||||
Armor & Resistances |
Armor is the category of in game items that can be equipped by a character mostly for defensive purposes. It generally has Resistances and other Item Properties used by a character in combat. This distinguishes armor from clothing, which typically does not. Some (but not all) types of armor can also be categorized more specifically by theme. Suits may or may not contain components for each equipment slot. For example, Leather Armor comes with a head covering while most other sets do not. Furthermore, some sets contain "alternative" Female Armor components. Note that all types of armor in a given set come with the same basic resistances. For example, a Platemail Gorget provides exactly the same level of protection as a Platemail Tunic. Armor that is Exceptionally crafted will receive a bonus that is further boosted by your character's Arms Lore skill, while Runic Tools can be used to send the total resistance level far higher. Some forms of armor are "medable," meaning they do not affect your use of the Meditation skill when worn. Elven armor can only be worn by Elves. The same way, Gargish armor can only be worn by Gargoyles.
| ||||||||||||
| |||||||||||||
Rune Stones, Facets & Moongates |
|
Previous: Introduction to the Interface |
Next: Hints and Tips |


